The space where the roof and wall meet is critical – and utilizing kick-out flashing is an essential element in preventing water damage to the structure of your build. In this blog, we cover what kick-out flashing is, common misconceptions that come along with this method, and how a builder can approach the transition between the roof and the wall.
What is Kick-Out Flashing?
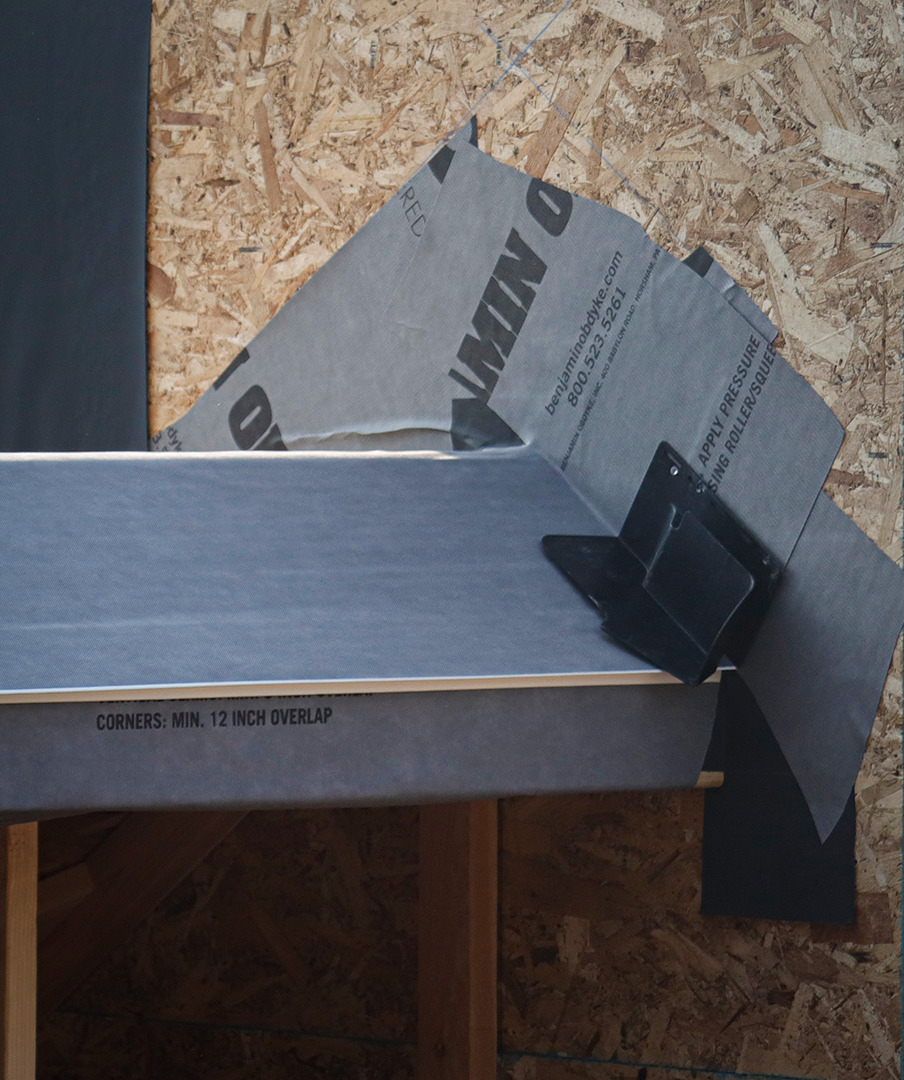
Kick-out flashing is a technique that is commonly used in roofing applications to prevent water from intruding into the exterior walls of a building. This is achieved by installing a 90-degree rigid product, usually metal, aluminum, or pre-fabricated plastic, meant for this application at the point where the roof and the wall meet. Doing so redirects water away from the wall and into the gutter system for drainage and helps prevent massive amounts of cascading water from these integration and transition points.
Common Misconceptions About Kick-Out Flashing Detail
- It’s Time-Consuming
- Many builders and installers believe that adding this detail takes a lot of time. However, there are products available that are easy to integrate into your roofing system. *pro-tip: you’ll want to install your kick-out flashing detail before you install the siding.*
- It’s Costly
- When you’re cutting costs from a project, it’s much easier for your customer to want to hold back on the things that they can’t see. However, incorporating this additional drainage mechanism into your build isn’t necessarily costly, and the benefits far exceed any potential drawbacks.
- It Doesn’t Make a Difference
- Those who choose to omit using kick-out flashing often are those who don’t know much about it or don’t see the immediate benefit. However, something else that we don’t see until it’s too late is how damaging trapped water can be over time. When you’re working on a roofing project – you’re trying to get the shingles on quickly, and you’re already integrating step flashing – so that should be enough, right? The answer is actually no. While step flashing is crucial to your roof assembly, it can’t divert the water to something, like the gutter system, that is designed to handle it – this is where kick-out flashing comes in.
- It Should Only Be Used In Areas with Heavy Rainfall
- Yes, you’ll want to integrate kick-out flashing in climates that receive a heavy amount of rainfall. However, coastal areas and the Pacific Northwest aren’t the only places that can benefit from this method. If you’re building in an area that is prone to snow accumulation, it can be advantageous to utilize kick-out flashing. Snow will often build on the roof and stay that way for a majority of winter in some places, but at a certain point – that snow has to melt, and when it does – you’ll want to make sure that mass amount of liquid water is being diverted to a drainage system that can handle it.
How Can Builders Properly Approach the Transition Between the Roof and the Wall?
It’s best to incorporate kick-out flashing in new construction or builds where new siding is involved. One of the first steps is assessing the basic waterproofing and moisture protection measures that need to happen as a whole. Once that’s done and you’ve installed the underlayment on the roof and the weather-resistive barrier on the wall system, you’ll want to use a joint method of kick-out flashing and step flashing at the intersecting points of the roof and the wall.
The devil is in the details, and paying mind to certain ones – like kick-out flashing – can be a key factor for moisture management. While Benjamin Obdyke doesn’t sell these specific products, we’d be more than happy to guide you into choosing one for your project. If you’re looking to integrate kick-out flashing into your next build, give us a call.